There are several different types of box ovens you can make. These instructions are for a box oven with a hinged lid. If you use the sturdy materials recommended and take good care of it, you should be able to reuse it many times! Remember: box ovens are for outside use ONLY.
*Click on any of the pictures below to see a larger version.
WHAT YOU NEED:
Two medium-sized sturdy boxes, very similar in size
Heavy-duty aluminum foil
Multi-purpose foil tape
Four empty aluminum cans
An aluminum pie tin
Charcoal briquettes (NOT the ones with lighter fluid in them!)
Note: each briquette generates about 50 degrees of heat.
You can't tell from the photo above, but you can see below that we used two similarly sized boxes. The inside box will be our oven. The second box (which can be a little smaller than the one we used) will be cut apart. Make sure the box you use for the oven is large enough to fit your baking pan, pie tin and aluminum cans!
This photo is simply showing you items needed for the box oven (these coals are not hot!). NEVER burn charcoal inside or on a table!
WHAT TO DO:
Cut one of the top flaps of the box off and attach it to the other flap, making one hinged "door" that will cover the entire box opening (as shown below). Use the foil tape to cover all corners, cracks and holes. NO cardboard should be exposed, or your box could catch on fire!
Use the heavy-duty foil to cover the entire box—shiny, reflective side OUT. Again, using the foil tape to cover all cracks, corners and holes. 
As mentioned earlier, the second box is being cut apart. Here, you can see how we started that process. You'll need five individual pieces of cardboard cut so that they fit well into the sides of the box oven, making double walls so your box oven is "insulated." Once your five pieces are cut, cover them with foil (shiny, reflective side out) using the foil tape to secure all cracks, corners and holes.
Once you've covered everything completely with foil, this is what it will look like (hopefully!).
Carefully place the foil-covered pieces of cardboard inside the box oven so that all five sides (not the door, of course) are "insulated" with the other pieces. Your box oven is now double-walled on five sides. Note that the hinged door opens UPWARD. This is to prevent excessive heat loss during the cooking process.
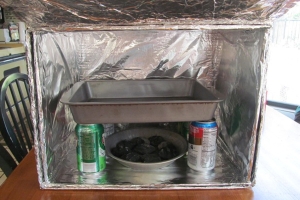
Then, place your four aluminum cans inside the box oven (weigh them down with some water so they don't tip over). Voila! Your box oven is done! This is what it will look like when you're ready to start cooking (except there will be food in the pan and your oven will be OUTSIDE on concrete or dirt). See below for cooking instructions.
When you're ready to start cooking, start your charcoal in a campfire or starter chimney. The charcoal is ready to use when it starts to turn grey. Each briquette generates about 50 degrees of heat, so plan accordingly. Using sturdy tongs, carefully place 8-9 pieces of burning charcoal in the pie tin; using hot pads or an oven mitt, place the tin in the box oven (which should be outside on concrete or dirt). Put the food you're baking inside a 9x13 metal pan (or pan that fits in your box oven) and place it on top of the aluminum cans.
This is what the closed box oven looks like. Be sure to put two heavy rocks in front of the "door" (leaving it just slightly cracked open so the charcoal has a tiny bit of air flow). The rocks will keep the door from opening or moving during the cooking process. The charcoal will keep its temperature for about an hour. It's a good idea to have additional burning coals ready to add (in the campfire or starter chimney), if needed. Do not leave the box oven unattended.
Have fun, be safe and happy camping!
----------------------------
Lisa Gipson is Managing Editor at San Diego Family and an enthusiastic Girl Scout leader for over 12 years. She and her troop Camp Mom, Laura, had fun making this box oven together and look forward to teaching their Cadette Girl Scouts how to use it.
Published: May 2014


