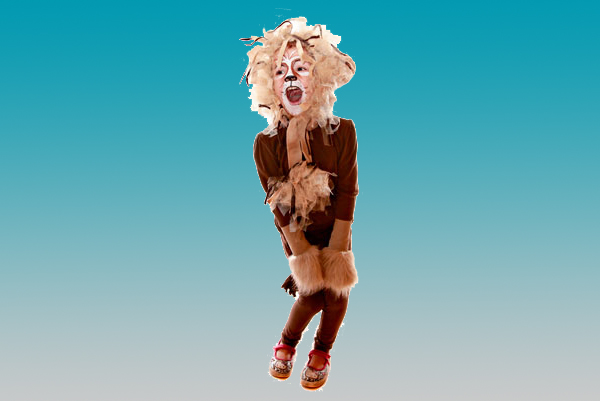
Looking for Halloween costume ideas for kids?
Here's how to make an adorable Lion costume for your kid. You just need some easy-to-use tools, a few materials, and your creativity and imagination. You don’t even need to sew any of the pieces—everything is made using glue, a stapler, or by tying pieces of material together. Use templates to cut fabric to the right sizes. And look out for great tips throughout the instructions. They will make your costume-making even easier!
These costume pieces have big impact with little effort. Just combine them with clothes already in your child’s closet. Get your child involved, too. Then have some fun creating a big cat costume for Halloween!
African Lion
Furry paws, a long tail, fun face paint, and a wild mane make this lion costume. Pair these pieces with a brown or tan shirt and pants to complete the look. Then roar your way from house to house as an African lion!
Lion Paw Cuffs
What You’ll Need:
- tan vinyl fabric (1/4 yard)
- tan furry fabric with long fur hairs (1/4 yard)
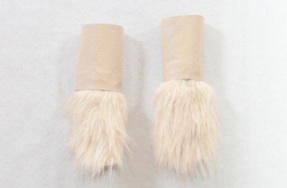
- sticky back Velcro (two 3-inch sections)
- mini hot glue gun and glue sticks
- scissors
- X-acto knife or razor blade
- Pen
Steps
- Cut two rectangles of tan vinyl. Make the width 4 inches and the length to fit around your child’s wrists.
- Lay the fur on a table so that the back of the fabric is facing you. Trace a half-oval shape around your child’s hand. Draw a flat edge at the bottom of the hand shape.
- Cut two pieces of the fur fabric. Try not to cut the fur. See the tip for help.
- Put a line of glue on the bottom flat edge of the furry side of the fur fabric. Press it to the middle of the wrong side of the vinyl. Hold it until the glue sets.
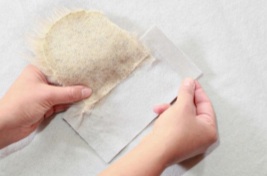
- Stick one side of the Velcro piece to a short end of the vinyl.
- Turn the vinyl over. Stick the other side of the Velcro piece to the opposite short end of the vinyl.
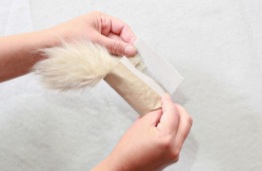
- Wrap the cuff around your child’s wrist and stick the Velcro pieces together. The fur hangs over the hand like a paw!
Tip ~Try This! Cut fur from the back of the material. Use an X-acto knife or razor blade to cut the netting that holds the fur. This will keep the fur hairs long and even on the other side. Using scissors can cut fur hairs into short and jagged pieces.
Shopping Tip! Buy materials for costumes at craft, fabric, and dollar stores. If you can’t find a face paint color at a craft store, check out one of the pop-up Halloween stores in your area. They have dozens of colors to choose from!
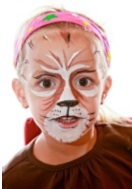
Lion Face Paint
What You’ll Need:
- black face paint
- white face paint
- brown face paint
- cosmetic sponges
- paint brushes
- cup of water
- paper towels
Steps
- Start with the white face paint. Use a damp paintbrush and draw a circle from the nose down around the chin and back up to the nose. Paint in with white paint. You can blend this a bit with a cosmetic sponge if you’d like. Paint white along the top of the nose. Then make a few white spikes on the forehead. Add white under the eyes and make small lines coming from the hairline into the face, too.

- Now use the brown face paint. Paint brown along the sides of the nose. Feather out onto the inner cheeks. Add strokes of brown along hairline next to the white stokes. Put a few whiskers coming out from both sides of the white circle by the mouth. Add a few linesat the bottom of the circle, too.
- Move to the black face paint. Paint the bottom part of the nose. Then paint a line down from the middle of the nose to the middle of the lip. Line the top lip and add lines that extend past the lip on each side. Make the lines curl up at the tip. Outline the bottom of the lower lip. Then add two rows of dots above the lip on both sides of the line from the nose to mouth. Paint a few black whiskers on each side of the white circle. Then add a black line above each eye. Make the lines curl up at the ends. Add a few lines around the hairline, and you are done!
Makeup Tips!
- Buy a face paint palette kit. These kits have a variety of colors and some comewith a sponge and paintbrush. Or buy tubes of cream makeup. Face paint sticks can be difficult to use.
- Pull hair back with a headband and start with a clean and moisturized face.
- Use a slightly damp cosmetic sponge to put makeup onto large areas of the face. Use different sponges for different colors. Pat sponge on a paper towel if it is too wet. Too much water makes the paint look streaked.
- Use a damp paintbrush for darker, more precise lines. Clean the paintbrush between colors.
- Make dots with the hard end of a paintbrush.
Lion Tail
What You’ll Need:
- dark brown felt (half of a 9 x 12 inch piece)
- tan fleece (approximately 1/2 yard)
- polyester stuffing
- stapler
- scissors
- knitting needle or stick (optional)
Steps
- Start by making the tuft. Cut the dark brown felt into thin strips. Cut from long end to long end.
- Take four strips out and set them aside. Pile the other strips together. Make the short ends even. Then fold the pile in half. Hold the folded end tightly and tie one of the remaining strips around the end. Set the tuft aside.
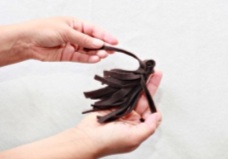
- Cut an 8 x 20 inch piece of tan fleece. Fold the piece in half so the long ends touch. Cut from the middle of one short end to the middle of the unfolded long end at an angle.
- Staple ¼ inch in along the cut edge of the fleece. Then turn the fleece piece inside out so the staples will not show on the outside of the tail. Do this carefully!
- Push the folded end of the tuft into the small opening of the tail. Tie a few of the felt strips around the fleece that is over the top of the tuft. Tie them tightly!
- Fill the tail with the stuffing. Use a knitting needle or stick to push the stuffing down. Leave the top 2 inches of the tail empty.
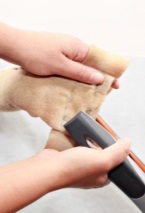
- Cut a strip of fleece to use as a belt. Make the width 2 inches. Cut the length to fit around your child’s waist.
- Put the top of the tail in the middle of the belt. Staple the belt to the top 2 inches of the tail. Staple in a rectangular shape so that the belt is attached securely. Now, just tie the belt through the belt loops of your child’s pants.
Lion Mane Hood
What You’ll Need:
- dark brown felt (half of a 9 x 12 inch piece)
- tan fleece (same material as tail) (approximately 1/2 yard)
- tan tulle fabric (1 yard)
- poster board (3 x 8 inch piece)
- scissors
- mini hot glue gun and glue sticks
- vase or tall container with a wide opening (optional)
- ruler
- pen
- pins

Steps:
- Cut two 15 x 18-inch pieces of tan fleece to make the hood. Lay them on top of each other. Use a few pins to hold the pieces together.
- Cut a rounded edge on one of the four corners. Start from about the middle of one side to the middle of the other side. This will be the back of the hood.
- Measure 4 inches in from one flat end and mark the spot with pen. The flat end will be the front of the hood.
- Cut strips down into the fleece from the outer edge to the middle of the piece. Make the strips approximately 4 inches long and 1 inch wide. Continue around the curved edge of the hood to the other flat edge of the fleece. Make sure you cut through both pieces of fleece!
- Tie the strips of fleece together. Tie a strip from one hood piece with a strip from the other hood piece.
- Open up the hood and set it on the vase. This open side is where the mane will be. Cut strips approximately 4 inches long and 1 inch wide along the open sides of the hood.
- Cut two 1 x 10 inch strips of tan fleece. These will be the ties for the hood. Knot one tie to each bottom strip of the hood.
- Now cut the tulle pieces. The tulle fabric will make the mane fluffy and full. To make one tulle piece, cut an 8 x 12 inch rectangle. Fold it in half so the short ends touch. Cut strips up toward the folded edge. Then roll one folded corner to the other folded corner. This makes a kind of tulle pom-pom with loose wild ends. Make approximately 20 tulle pieces.
- To attach the tulle pieces to the hood, sandwich one between two fleece strips. Tie the tulle in place. You may have to make two knots to keep it securely in place. Continue around the hood until all the fleece strips have been tied to a tulle piece. Save four tulle pieces for the ties.
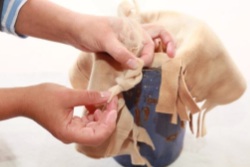
 Cut up 4 inches from the bottom of the ties. Knot two tulle pieces at the end of each tie.
- Cut thin strips from the dark brown felt. Tie them onto the fleece. Add them around the top and the bottom of the mane. Add a few strips to the ties, too.
- Now add the ears. Cut two pieces of poster board creating a lion ear template. Then two pieces of tan fleece for each ear. Use the template, but make the flat edge about an inch longer.
- Use the mini hot glue gun to sandwich the poster board between two fleece pieces. Only put glue on the poster board. This leaves an open flap of fabric at the bottom.
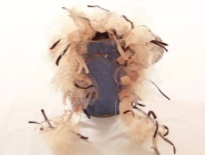
- Open up the flaps on each ear. Mark where you want to place the ears on the hood. Put glue on the flaps of one ear and press the flaps to the hood. Hold in place until the glue dries. Repeat on the other side with the other ear.
Written by Karen Latchana Kenney
Photography by Serah Sauser
About the Author
Karen Latchana Kenney is the author of over 70 published books. She has written many craft books for children and dozens of educational books for children and teens. For a complete list of Kenney’s published works, visit latchanakenney.wordpress.com.
About the Photographer
Serah Sauser is a photographer based in Minneapolis, Minnesota. She shoots everything from kids to musicians and fashion. Visit www.serahstar.com or Facebook: Photography by Serah to view her photography.


